
A line-following robot is the classic robotics project — a small car that drives itself along a black line on the floor. It’s the perfect way to learn about motors, sensors and simple decision-making with Arduino.
What you’ll need
- Arduino Uno R3 — runs the robot
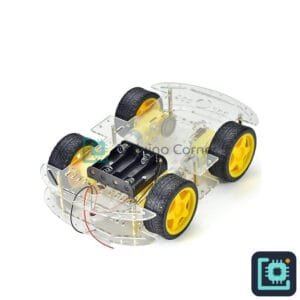
- Smart Car Chassis Kit — the frame, motors and wheels
- L298N Motor Driver — drives the two motors from the Arduino
- TCRT5000 Line Tracking Sensors (x2) — follow the black line
- 18650 Battery Holder — powers the motors
- Jumper Wires — to connect everything
How it works
Two infrared line sensors point at the floor — one on the left, one on the right of the line. A black line reflects less light than the white floor, so each sensor tells the Arduino whether it can “see” the line. The Arduino then steers: if the line drifts left, it slows the left motor to turn back; if it drifts right, it slows the right motor.
Wiring overview
- Left sensor OUT → D2, Right sensor OUT → D3 (both VCC→5V, GND→GND).
- L298N IN1→D8, IN2→D9 (left motor), IN3→D10, IN4→D11 (right motor).
- L298N ENA and ENB → 5V (full speed) or PWM pins for speed control.
- Battery pack → L298N 12V input; L298N 5V output can power the Arduino.
The Arduino code
// Line-following robot (2 IR sensors + L298N)
int leftSensor = 2, rightSensor = 3;
int IN1 = 8, IN2 = 9, IN3 = 10, IN4 = 11;

void setup() {
  pinMode(leftSensor, INPUT);
  pinMode(rightSensor, INPUT);
  pinMode(IN1, OUTPUT); pinMode(IN2, OUTPUT);
  pinMode(IN3, OUTPUT); pinMode(IN4, OUTPUT);
}

void forward()   { digitalWrite(IN1,HIGH);digitalWrite(IN2,LOW);digitalWrite(IN3,HIGH);digitalWrite(IN4,LOW); }
void turnLeft()  { digitalWrite(IN1,LOW); digitalWrite(IN2,LOW);digitalWrite(IN3,HIGH);digitalWrite(IN4,LOW); }
void turnRight() { digitalWrite(IN1,HIGH);digitalWrite(IN2,LOW);digitalWrite(IN3,LOW); digitalWrite(IN4,LOW); }
void stopBot()   { digitalWrite(IN1,LOW); digitalWrite(IN2,LOW);digitalWrite(IN3,LOW); digitalWrite(IN4,LOW); }

void loop() {
  int L = digitalRead(leftSensor);
  int R = digitalRead(rightSensor);
  // LOW = line detected (typical for these modules)
  if (L == HIGH && R == HIGH) forward();     // both on white -> go straight
  else if (L == LOW && R == HIGH) turnLeft();  // line on left
  else if (L == HIGH && R == LOW) turnRight(); // line on right
  else stopBot();
}
Tip: the sensor logic (LOW vs HIGH for “line detected”) can be reversed on some modules — use the on-board trimmer pot to adjust sensitivity, and swap the conditions if your robot steers the wrong way.
Get the parts
Everything for this project is in stock at Smart Home | Arduino Corner — Shaheen Market, DAV College Road, Rawalpindi — with fast, cash-on-delivery shipping across Pakistan. Start with the chassis kit, an L298N driver and line sensors. Browse the full store →