
Want your Arduino to show the temperature and humidity of any room on a real screen — with no computer attached? It’s one of the most useful (and most popular) beginner projects, and you only need three main parts: an Arduino Uno, a DHT11 sensor and an I2C 16×2 LCD. In this step-by-step guide you’ll wire it up, upload the code, and read live values on the display in about 20 minutes.
You’ll get a clear wiring diagram, the full Arduino sketch, and fixes for the two things that trip everyone up. Every part is in stock at Arduino Corner and ships across Pakistan with cash on delivery.
What you’ll need
- Arduino Uno R3 (with USB cable) — runs the code and powers the circuit
- DHT11 Temperature & Humidity Sensor — measures the room’s temperature and humidity
- 16×2 I2C LCD Display — shows the readings using just two signal wires
- Solderless Breadboard — holds everything together without soldering
- Male-to-Female Jumper Wires — connect the modules to the Arduino
Just getting started? The Arduino Uno Starter Kit bundles the board, breadboard and jumper wires in one box.
Wiring diagram
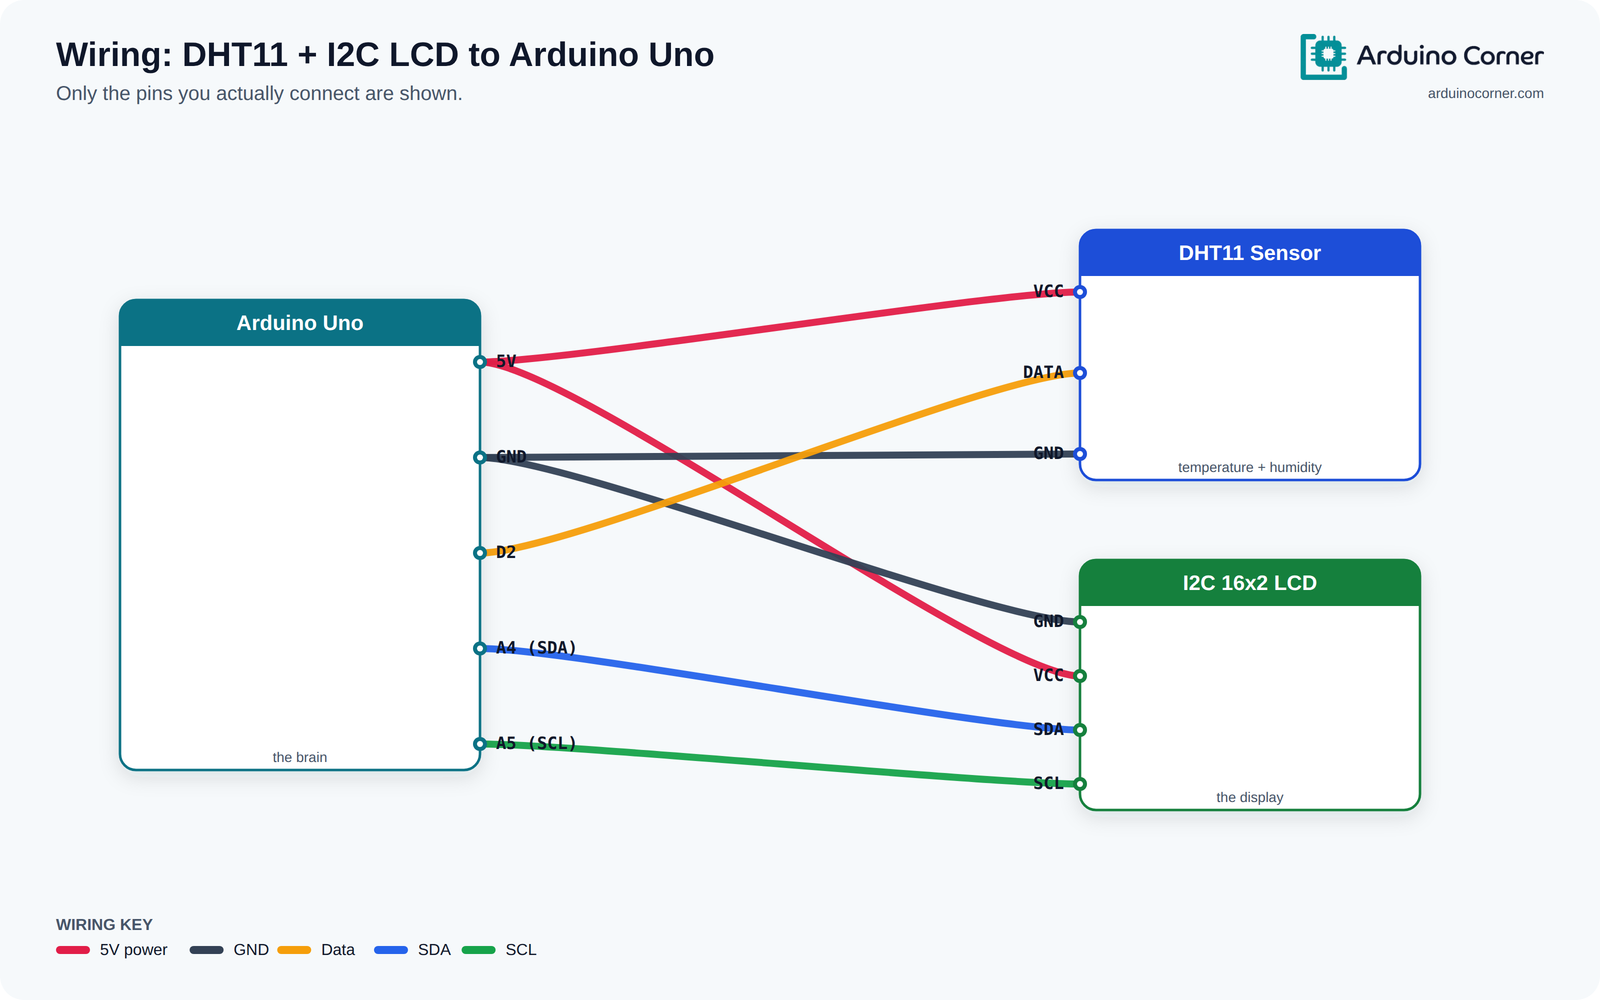
The same connections as a quick reference table:
| From (module) | To (Arduino Uno) |
|---|---|
| DHT11 — VCC | 5V |
| DHT11 — DATA | D2 |
| DHT11 — GND | GND |
| LCD — VCC | 5V |
| LCD — GND | GND |
| LCD — SDA | A4 |
| LCD — SCL | A5 |
Tip: both the DHT11 and the LCD need 5V and GND. Since the Uno has only one 5V pin, use the breadboard’s red (+) and blue (–) power rails to share power and ground between the two modules.
How the circuit works
The DHT11 is a digital sensor. Inside it there’s a tiny thermistor (for temperature) and a capacitive humidity element, plus a small chip that packages the readings and sends them to the Arduino over a single data wire. That’s why it only needs one signal pin (D2) — the library handles all the timing for you.
The display is an I2C LCD. A normal 16×2 LCD needs six or more pins, but this one has a small PCF8574 “backpack” soldered to the back that converts the display to the I2C bus. I2C needs only two signal lines — SDA (data, on A4) and SCL (clock, on A5) — which frees up the rest of your Arduino’s pins for sensors and other parts.
The Arduino code
Before uploading, install two libraries from Sketch → Include Library → Manage Libraries: search for “DHT sensor library” by Adafruit (accept its Adafruit Unified Sensor dependency) and “LiquidCrystal I2C” by Frank de Brabander.
#include <Wire.h>
#include <LiquidCrystal_I2C.h>
#include <DHT.h>

#define DHTPIN 2        // DHT11 DATA pin -> Arduino D2
#define DHTTYPE DHT11
DHT dht(DHTPIN, DHTTYPE);

// Most 16x2 I2C backpacks live at address 0x27; some are 0x3F.
LiquidCrystal_I2C lcd(0x27, 16, 2);

void setup() {
  lcd.init();
  lcd.backlight();
  dht.begin();
  lcd.setCursor(0, 0);
  lcd.print("Arduino Corner");
  delay(1500);
  lcd.clear();
}

void loop() {
  float t = dht.readTemperature();   // in Celsius
  float h = dht.readHumidity();

  // The sensor returns "nan" if a reading fails.
  if (isnan(t) || isnan(h)) {
    lcd.setCursor(0, 0);
    lcd.print("Sensor error    ");
    delay(1000);
    return;
  }

  lcd.setCursor(0, 0);
  lcd.print("Temp: ");
  lcd.print(t, 1);
  lcd.print((char)223);   // degree symbol
  lcd.print("C ");

  lcd.setCursor(0, 1);
  lcd.print("Humidity: ");
  lcd.print(h, 0);
  lcd.print("% ");

  delay(2000);   // DHT11 refreshes about once per second
}
Understanding the code
dht.readTemperature() and dht.readHumidity() ask the sensor for fresh values. We store them in float variables so decimals are kept. The isnan() check catches a failed read (a loose wire, or asking too fast) and prints a friendly message instead of garbage. Finally, lcd.setCursor(column, row) moves the “cursor” to the start of each line before printing, and (char)223 prints the little ° degree symbol. The delay(2000) matters: the DHT11 only updates about once a second, so there’s no point reading faster.
Troubleshooting
- Backlight is on but there’s no text (or just a row of blocks): this is almost always the I2C address or the contrast. Try changing
0x27to0x3Fin the code, or run an “I2C scanner” sketch to find the exact address. If faint blocks show, turn the small blue potentiometer on the back of the LCD to set the contrast. - Display reads “Sensor error” or values are “nan”: check that DATA goes to D2 and that VCC/GND are firm. Give it a second or two after power-up — the first read can fail.
- Nothing happens at all: confirm both modules share 5V and GND through the breadboard rails, and that Tools → Board is set to “Arduino Uno” with the correct COM port.
Take it further
- Add a buzzer that beeps when the temperature crosses a limit — an instant heat alarm.
- Swap the DHT11 for a DHT22 for a wider range and one-decimal accuracy (just change
DHT11toDHT22in the code). - Show the readings on a 0.96″ OLED instead — see our OLED guide.
Frequently asked questions
What is the difference between the DHT11 and DHT22?
The DHT11 is cheaper and perfect for learning, reading 0–50°C and 20–90% humidity in whole numbers. The DHT22 (AM2302) is more accurate, reads a wider range (−40 to 80°C), and gives one decimal place. The wiring and code are almost identical.
Why use an I2C LCD instead of a normal 16×2 LCD?
A standard 16×2 LCD needs six or more Arduino pins and a contrast resistor. The I2C version uses only two signal pins (SDA and SCL), so it’s far simpler to wire and leaves pins free for your sensors.
What is the I2C address of my LCD?
Most PCF8574 backpacks are 0x27, and some are 0x3F. If nothing shows, upload a short “I2C scanner” sketch — it prints the exact address to the Serial Monitor.
Can I run this from a power bank?
Yes. Once the code is uploaded, the Arduino runs standalone — power it from any USB phone charger or power bank and it becomes a portable room thermometer.
Related project guides
- Show text & sensor data on a 0.96″ OLED with Arduino
- Control home appliances with a relay module and Arduino
- Build an obstacle-avoiding robot with an ultrasonic sensor
Get the parts
Everything for this build is in stock at Smart Home | Arduino Corner — Shaheen Market, DAV College Road, Rawalpindi — and ships across Pakistan with cash on delivery. Grab the DHT11 sensor and the I2C 16×2 LCD, or message us on WhatsApp and we’ll put the whole kit together for you.