
Build an automatic night light that switches an LED on when it gets dark and off when it’s bright — no switch needed. It uses an LDR (light-dependent resistor), one of the simplest and most satisfying sensors to learn with. The same idea powers automatic street lights.
Here’s the wiring diagram, the Arduino code, and how to tune the darkness level. All parts are in stock at Arduino Corner.
What you’ll need
- Arduino Uno R3 (with USB cable) — runs the code
- LDR Photoresistor — senses how bright it is
- White LED — the light that turns on
- Solderless Breadboard — builds the divider circuit
- Jumper Wires (M-M) — for breadboard wiring
You’ll also need a 10kΩ resistor (for the LDR divider) and a 220Ω resistor (for the LED) — both are in most starter kits.
Wiring diagram
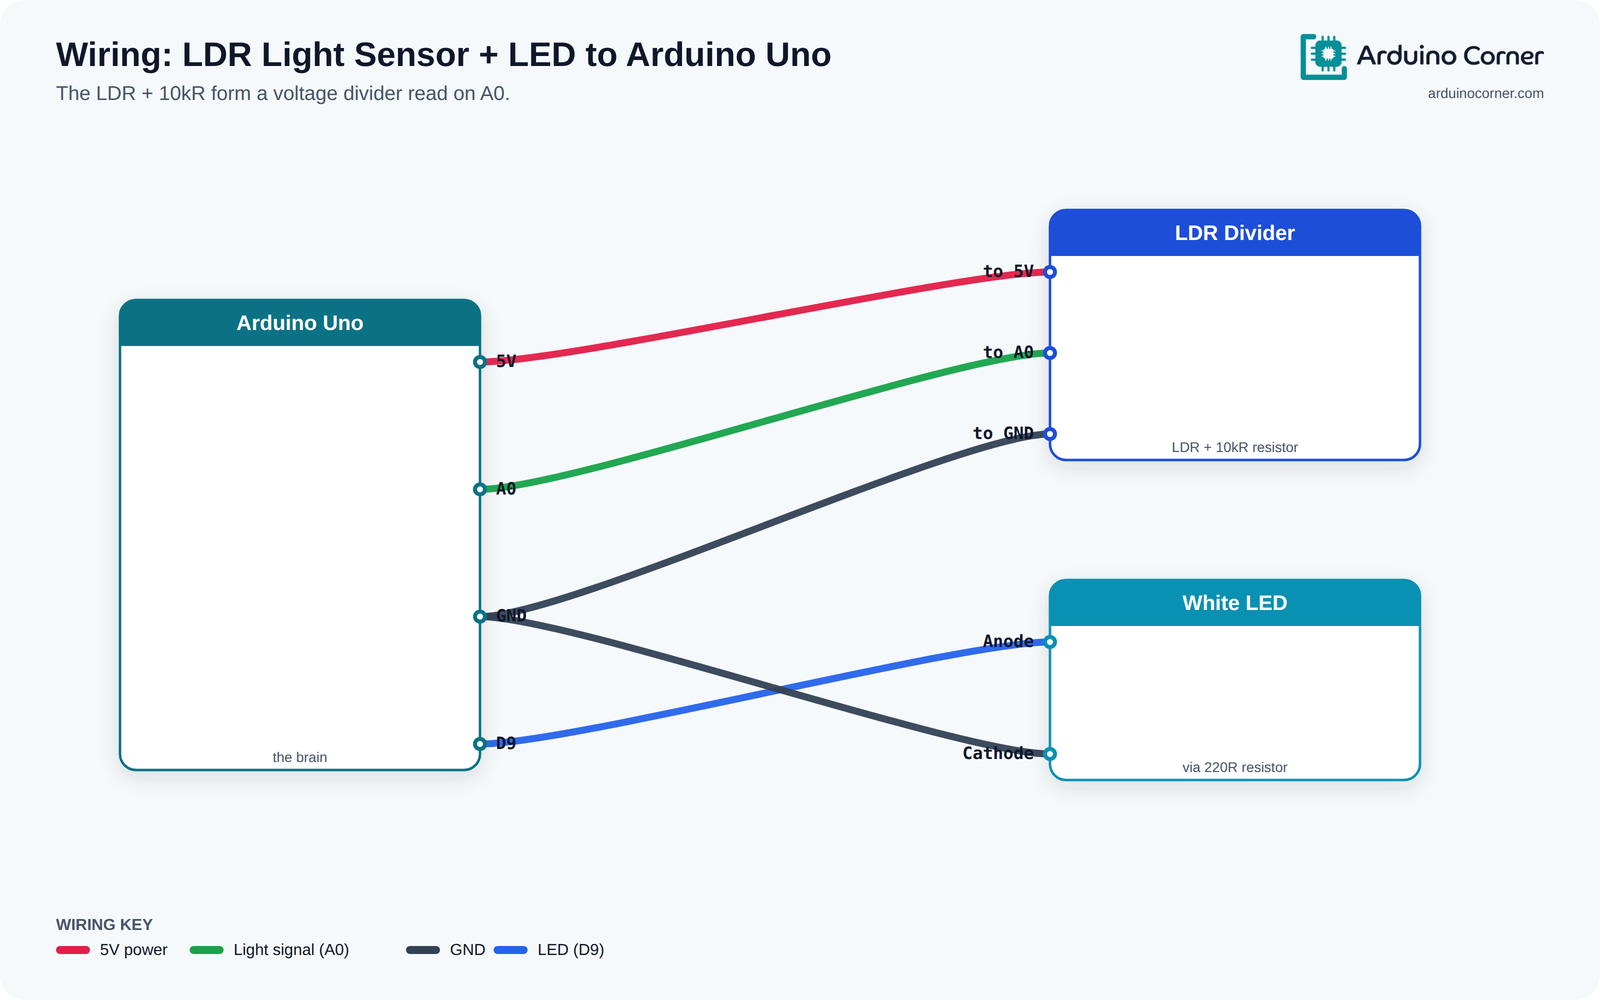
The same connections as a quick reference table:
| From (module) | To (Arduino Uno) |
|---|---|
| LDR leg 1 | 5V |
| LDR leg 2 + 10kΩ | A0 |
| 10kΩ other end | GND |
| LED — Anode (+) | D9 (via 220Ω) |
| LED — Cathode (−) | GND |
Tip: The LDR and the 10kΩ resistor form a voltage divider: connect them in series between 5V and GND, and read the junction between them with A0.
How it works
An LDR’s resistance falls in bright light and rises in the dark. On its own the Arduino can’t read resistance, so we pair it with a fixed 10kΩ resistor to make a voltage divider. As the light changes, the voltage at the middle point changes, and the Arduino reads that on A0. When the reading drops below your “dark” level, it turns the LED on.
The Arduino code
No libraries needed — just built-in Arduino functions.
#define LDR_PIN A0
#define LED_PIN 9
const int DARK_LEVEL = 400;   // lower reading = darker (calibrate yours)

void setup() {
  Serial.begin(9600);
  pinMode(LED_PIN, OUTPUT);
}

void loop() {
  int light = analogRead(LDR_PIN);
  Serial.println(light);

  if (light < DARK_LEVEL) {         // it is dark
    digitalWrite(LED_PIN, HIGH);    // turn the light ON
  } else {
    digitalWrite(LED_PIN, LOW);     // turn the light OFF
  }
  delay(500);
}
Understanding the code
analogRead(LDR_PIN) gives 0–1023. Cover the LDR and note the low reading, shine a light and note the high one, then set DARK_LEVEL between them. If the light turns on and off in reverse, simply swap the < for >.
Troubleshooting
- LED never turns on: your
DARK_LEVELmay be too low — check the Serial Monitor reading in the dark and raise it. - LED is always on: the divider may be wired wrong. Make sure the LDR and 10kΩ are in series with A0 tapped between them.
- LED very dim or dead: check the 220Ω resistor and that the long (anode) leg goes to D9.
Take it further
- Drive a relay instead of an LED to switch a real mains bulb (an automatic street light).
- Use
analogWrite()to fade the LED smoothly as it gets darker. - Add a display showing the live light level.
Frequently asked questions
What is an LDR?
A light-dependent resistor — a component whose resistance changes with light. It’s cheap, reliable and perfect for learning about analog sensors.
Why do I need the 10kΩ resistor?
The Arduino reads voltage, not resistance. The fixed resistor turns the LDR’s changing resistance into a changing voltage it can read on A0.
Can this switch a real light bulb?
Yes — replace the LED with a relay module and it becomes an automatic street/porch light. Let an adult handle any mains wiring.
Related project guides
- Build an automatic plant watering system
- Build a temperature & humidity meter
- Show sensor data on a 0.96″ OLED
Get the parts
Everything for this build is in stock at Smart Home | Arduino Corner — Shaheen Market, DAV College Road, Rawalpindi — and ships across Pakistan with cash on delivery. Grab an LDR and some white LEDs. Message us on WhatsApp and we’ll put the whole kit together for you.