
A clap-activated light is a fun, impressive project: clap your hands and the light turns on; clap again and it turns off. It uses a sound sensor to “hear” the clap and a relay (or LED) to switch the light — a great science-fair build.
What you’ll need
- Arduino Uno R3 — detects the clap and switches the light
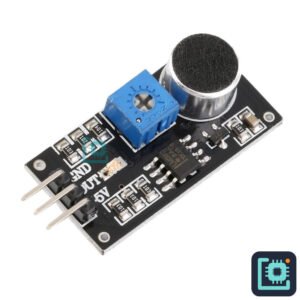
- LM393 Sound Detection Sensor — “hears” the clap
- 1-Channel Relay Module — switches a lamp on and off
- 5mm LED — a simple alternative to a relay for testing
- Mini Breadboard — build it without soldering
- Jumper Wires — to connect the parts
How it works
The sound sensor has a tiny microphone and a comparator. When a sound is louder than a threshold (set by the on-board trimmer pot), its D0 pin goes HIGH for an instant. The Arduino watches for that pulse and toggles the relay — so each clap flips the light between on and off.
Wiring
- Sound sensor VCC→5V, GND→GND, D0→D2
- Relay VCC→5V, GND→GND, IN→D8
- Wire your lamp through the relay’s COM and NO terminals.
Safety: if you switch mains-voltage appliances, have an adult help and be very careful — for learning, an LED on D8 is perfectly safe.
The Arduino code
int soundPin = 2;   // sound sensor D0
int relayPin = 8;   // relay IN (or an LED)
bool lightOn = false;

void setup() {
  pinMode(soundPin, INPUT);
  pinMode(relayPin, OUTPUT);
  digitalWrite(relayPin, LOW);
}

void loop() {
  if (digitalRead(soundPin) == HIGH) {   // clap detected
    lightOn = !lightOn;                   // flip the state
    digitalWrite(relayPin, lightOn ? HIGH : LOW);
    delay(300);                           // ignore the clap's echo
  }
}
Turn the trimmer pot on the sound sensor until a normal clap triggers it but background noise does not.
Want a ready-made version? Our DIY Sound-Operated Light STEM kit puts this whole project on a neat wooden stand — ask us about it on WhatsApp.
Get the parts
Everything for this project is in stock at Smart Home | Arduino Corner — Shaheen Market, DAV College Road, Rawalpindi — with fast, cash-on-delivery shipping across Pakistan. Get the sound sensor and a relay module to build your own. Browse the full store →