
Most project boards get looked at. This one gets played. The Arduino flashes a colour sequence, you repeat it on the matching buttons, and every round adds one more step. Get it wrong and the buzzer says so.
It is the classic Simon Says game, and it teaches arrays, random numbers, button handling and game state in one small, genuinely fun build.
What you’ll need
- Arduino Uno R3 (with USB cable) — runs the game
- 4 × coloured LEDs — plus a 220Ω resistor each
- 4 × push buttons — one per colour
- Active Piezo Buzzer — tones and the error sound
- 830-Point Breadboard and Jumper Wires (M-M)
New to Arduino? Start with the Arduino Uno Starter Kit.
Wiring diagram
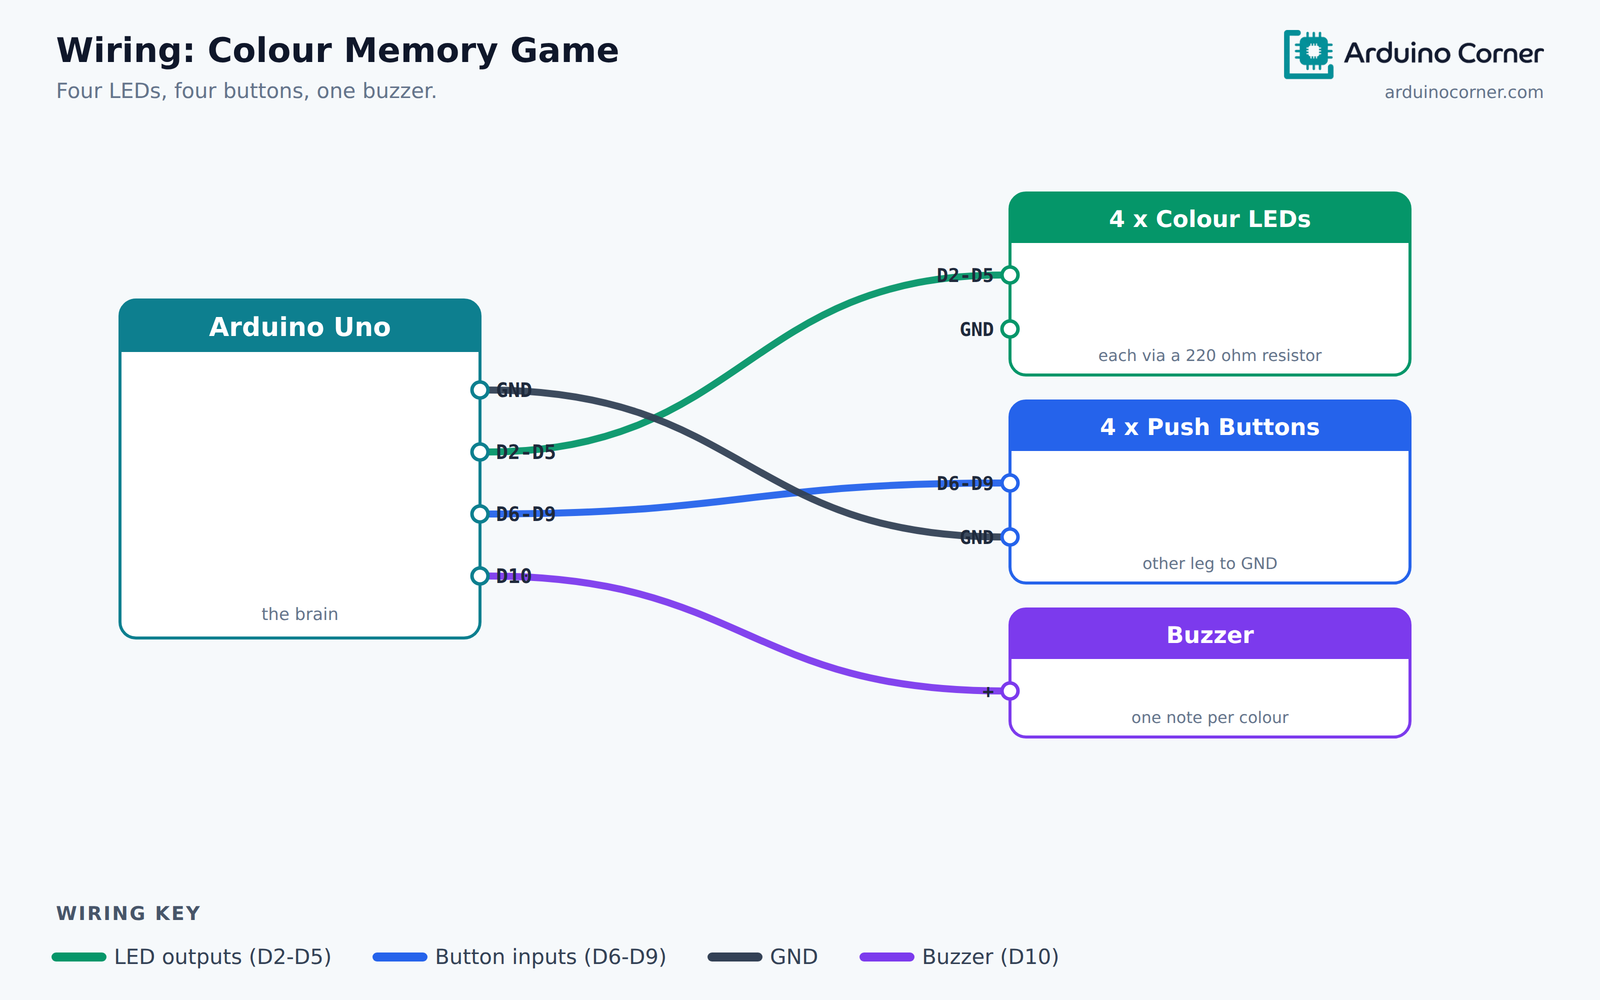
The same connections as a quick reference table:
| From (module) | To (Arduino Uno) |
|---|---|
| LED 1–4 (anodes, via 220Ω) | D2, D3, D4, D5 |
| LED cathodes | GND |
| Button 1–4 (one leg) | D6, D7, D8, D9 |
| Button other leg | GND |
| Buzzer — + | D10 |
| Buzzer — − | GND |
No resistors on the buttons. INPUT_PULLUP switches on the Arduino’s internal pull-up resistors, so each button simply shorts its pin to GND when pressed.
How it works
The game keeps an array of colours. Each round it appends one new random colour, replays the whole sequence, then waits for you to repeat it. Match every step and the sequence grows; miss one and it resets.
Because each colour also plays its own musical note, you start to remember the tune as much as the colours — which is exactly why the original game was so addictive.
The Arduino code
const int leds[4]    = {2, 3, 4, 5};
const int buttons[4] = {6, 7, 8, 9};
const int buzzerPin  = 10;

int sequence[50];
int level = 0;

void setup() {
  for (int i = 0; i < 4; i++) {
    pinMode(leds[i], OUTPUT);
    pinMode(buttons[i], INPUT_PULLUP);   // buttons wire to GND
  }
  pinMode(buzzerPin, OUTPUT);
  randomSeed(analogRead(A0));            // different game every time
}

void flash(int i, int ms) {
  digitalWrite(leds[i], HIGH);
  tone(buzzerPin, 220 + i * 110, ms);    // each colour has its own note
  delay(ms);
  digitalWrite(leds[i], LOW);
  delay(80);
}

int waitForPress() {
  while (true) {
    for (int i = 0; i < 4; i++) {
      if (digitalRead(buttons[i]) == LOW) {
        flash(i, 200);
        while (digitalRead(buttons[i]) == LOW);   // wait for release
        return i;
      }
    }
  }
}

void loop() {
  sequence[level] = random(4);           // add one new colour
  level++;

  for (int i = 0; i < level; i++) {      // play the sequence back
    flash(sequence[i], 350);
  }

  for (int i = 0; i < level; i++) {      // now the player repeats it
    if (waitForPress() != sequence[i]) {
      tone(buzzerPin, 120, 700);         // wrong - game over
      delay(1200);
      level = 0;
      return;
    }
  }
  delay(600);
}
Understanding the code
randomSeed(analogRead(A0)) matters. Without it, the Arduino produces the same “random” sequence after every reset, and the game becomes memorisable. Reading an unconnected analog pin gives electrical noise to seed from, so each game differs.
The line while (digitalRead(buttons[i]) == LOW); looks odd — a loop with no body. It simply waits for you to let go of the button, so one press counts once rather than being read hundreds of times.
Buttons read LOW when pressed here, because INPUT_PULLUP holds the pin HIGH until the button connects it to ground.
Troubleshooting
- One press registers several times: the release-wait loop is missing or the button is bouncing. Add a short
delay(20)after detecting the press. - Same sequence every game:
randomSeed()is missing, or A0 has something connected to it. Leave A0 floating. - An LED stays dim: check the resistor value and that the long leg goes to the Arduino pin.
- Buzzer silent:
tone()needs an active or passive buzzer on a normal digital pin — check the polarity. - A button does nothing: most tactile buttons have four legs in two connected pairs. Rotate it 90° in the breadboard.
Take it further
- Speed the playback up as the level rises, so it gets genuinely hard.
- Show the score on a 16×2 LCD or a 7-segment display.
- Store the high score in EEPROM so it survives a power cut.
- Add a two-player mode where players alternate rounds.
Prefer it ready-made?
Button bounce and timing are what usually ruin a home-built memory game. If you would rather skip the wiring, we sell this exact project fully assembled and mounted on a presentation board — see the Arduino Colour Memory Game Project. It is the same circuit described above, built and ready to demonstrate, which is what most students submitting a project actually need.
Frequently asked questions
How long can the sequence get?
The array holds 50 steps. Nobody gets close — most people fail somewhere between 8 and 15.
Why do my buttons read LOW when pressed?
Because INPUT_PULLUP holds the pin HIGH by default; pressing the button connects it to GND. It saves you four external resistors.
Can I use more than four colours?
Yes — add LEDs and buttons, and change the 4 in the loops and in random(4).
Is this a good school project?
It is one of the best, precisely because it is interactive. Examiners and classmates queue up to try it, and you can explain arrays and state clearly while they do.
Related project guides
Get the parts
Everything for this build is in stock at Smart Home | Arduino Corner — Shaheen Market, DAV College Road, Rawalpindi — and ships across Pakistan with cash on delivery. Grab a pack of coloured LEDs, some push buttons and a Active Piezo Buzzer. Message us on WhatsApp and we will put the whole kit together for you.