
Walk towards the stairs and the steps light up one after another in the direction you are heading. Reach the top, and they switch off behind you. Two IR sensors — one at each end — tell the Arduino which way you are travelling, and it runs the LED sequence to match.
This is a genuine smart-home idea rather than a toy demo: it saves electricity, it stops people feeling for a switch in the dark, and it looks expensive.
What you’ll need
- Arduino Uno R3 (with USB cable) — runs the code
- 2 × IR Obstacle Sensor Module — one at the top, one at the bottom
- 6 × LEDs — one per step, each with a 220Ω resistor
- 830-Point Breadboard and Jumper Wires (M-M)
New to Arduino? Start with the Arduino Uno Starter Kit.
Wiring diagram
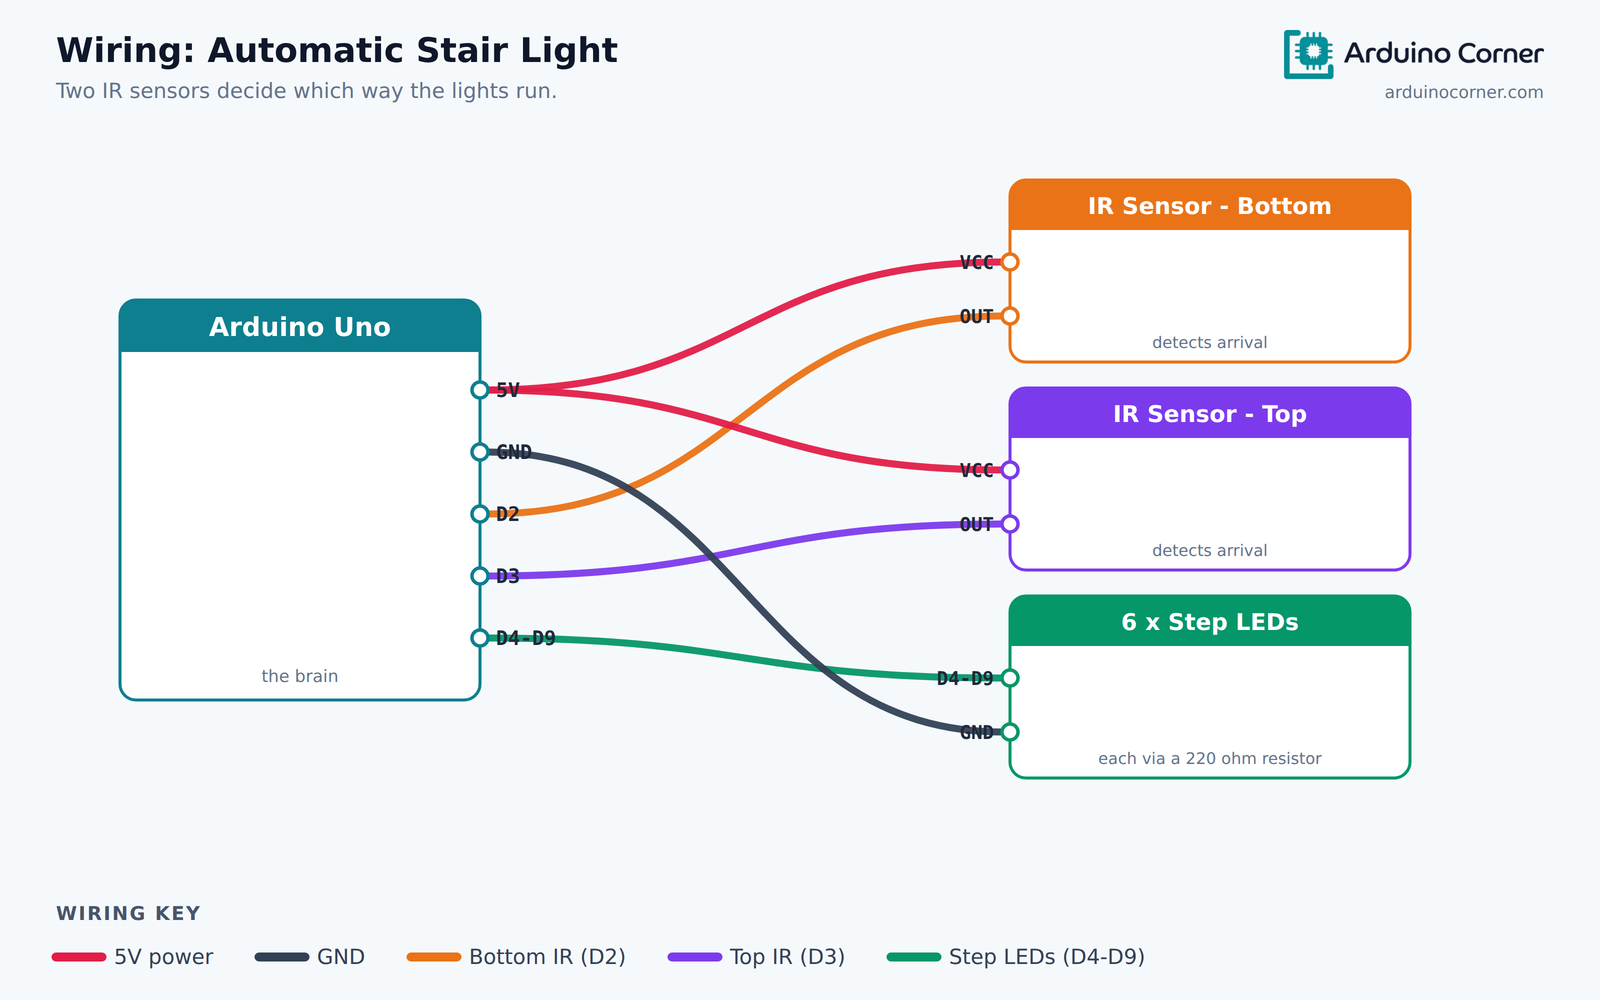
The same connections as a quick reference table:
| From (module) | To (Arduino Uno) |
|---|---|
| Bottom IR sensor — OUT | D2 |
| Top IR sensor — OUT | D3 |
| Both IR sensors — VCC | 5V |
| Both IR sensors — GND | GND |
| Step LEDs 1–6 (anodes) | D4, D5, D6, D7, D8, D9 |
| LED cathodes — via 220Ω | GND |
Do not skip the resistors. An LED wired straight to a pin will draw more current than the pin is rated for and will eventually damage the Arduino.
How it works
An IR obstacle sensor sends out infrared light and watches for a reflection. When something is in front of it, its OUT pin goes LOW — which catches people out, since “detected” usually feels like it should be HIGH.
Whichever sensor sees you first tells the Arduino your direction. Trip the bottom sensor and the lights run upward; trip the top one and they run down. That is the whole trick, and it is why two sensors are needed rather than one.
The Arduino code
const int irBottom = 2;               // sensor at the bottom step
const int irTop    = 3;               // sensor at the top step
const int steps[]  = {4, 5, 6, 7, 8, 9};
const int numSteps = 6;

const int stepDelay = 150;            // gap between steps lighting
const unsigned long holdTime = 5000;  // how long they stay on

void setup() {
  pinMode(irBottom, INPUT);
  pinMode(irTop, INPUT);
  for (int i = 0; i < numSteps; i++) {
    pinMode(steps[i], OUTPUT);
  }
}

void sweep(bool goingUp) {
  for (int i = 0; i < numSteps; i++) {          // light them in order
    digitalWrite(steps[goingUp ? i : numSteps - 1 - i], HIGH);
    delay(stepDelay);
  }

  delay(holdTime);                              // stay on while you walk

  for (int i = 0; i < numSteps; i++) {          // and switch off behind you
    digitalWrite(steps[goingUp ? i : numSteps - 1 - i], LOW);
    delay(stepDelay);
  }
}

void loop() {
  if (digitalRead(irBottom) == LOW) {
    sweep(true);
  } else if (digitalRead(irTop) == LOW) {
    sweep(false);
  }
}
Understanding the code
The interesting line is steps[goingUp ? i : numSteps - 1 - i]. Rather than writing two nearly identical loops, we index the array forwards or backwards depending on direction — one function handles both cases.
Each sensor has a small potentiometer that sets its detection range. Turn it down so the sensor only sees someone genuinely at the step, not the opposite wall.
Troubleshooting
- Lights run constantly: a sensor is seeing a wall or the floor. Reduce its range with the onboard pot, or angle it away.
- Nothing happens: check the sensor logic — these modules read LOW when triggered. Most modules also have an indicator LED that lights on detection; use it to confirm.
- Only one direction works: one sensor is on the wrong pin, or its wiring is loose.
- An LED never lights: LEDs are polarised. The long leg is the anode and goes to the Arduino pin.
Take it further
- Fade the steps in and out with
analogWrite()on the PWM pins — far classier than snapping on. - Add an LDR so the system only runs after dark.
- Replace the single LEDs with LED strips for a real staircase.
- Keep the lights on longer if the person stops halfway.
Prefer it ready-made?
Aligning two IR sensors so they trigger reliably without false-firing is the tricky part here. If you would rather skip the wiring, we sell this exact project fully assembled and mounted on a presentation board — see the Arduino Automatic Stair Light Project. It is the same circuit described above, built and ready to demonstrate, which is what most students submitting a project actually need.
Frequently asked questions
Why two sensors instead of one?
One sensor can tell you somebody is there, but not which way they are going. Two sensors give you direction, which is what makes the sequence run the correct way.
Can I use it on a real staircase?
Yes, with LED strips instead of single LEDs and a suitable driver. Keep the Arduino and its wiring safely enclosed.
How many steps can it handle?
An Uno can drive around a dozen LEDs directly. Beyond that, use a shift register or an LED driver chip.
Can I use ultrasonic sensors instead?
You can, and they detect at greater range, but they are slower and more prone to false readings in a narrow stairwell. IR is the better fit here.
Related project guides
Get the parts
Everything for this build is in stock at Smart Home | Arduino Corner — Shaheen Market, DAV College Road, Rawalpindi — and ships across Pakistan with cash on delivery. Grab two IR Obstacle Sensor Module units and a pack of 5mm LEDs. Message us on WhatsApp and we will put the whole kit together for you.