
A 220V PIR motion sensor is the cheapest real automation you can add to a house. No app, no Wi-Fi, no subscription — just a sensor wired between your mains and a lamp, so the light comes on when someone is there and goes off when they leave. This guide covers exactly how it wires up, how to set it, and the mistakes that make people think the sensor is faulty when it isn’t.
What the three wires actually do
People get stuck here more than anywhere else. A PIR sensor is not a two-wire switch. It contains electronics that need power all the time, even when the lamp is off — that is why it needs a neutral of its own.
- Live (L, usually brown) — permanent 220V feed in. This powers the sensor.
- Neutral (N, usually blue) — the return for the sensor’s own electronics.
- Load / OUT (white on our units, sometimes red or yellow) — the live feed that the sensor switches through to your lamp. Colours do vary between batches, so treat the label printed on your own unit as the authority.
The lamp then needs a neutral too, and that comes from the same mains neutral — you simply join it at the sensor’s neutral terminal or at the junction box.
The wiring diagram
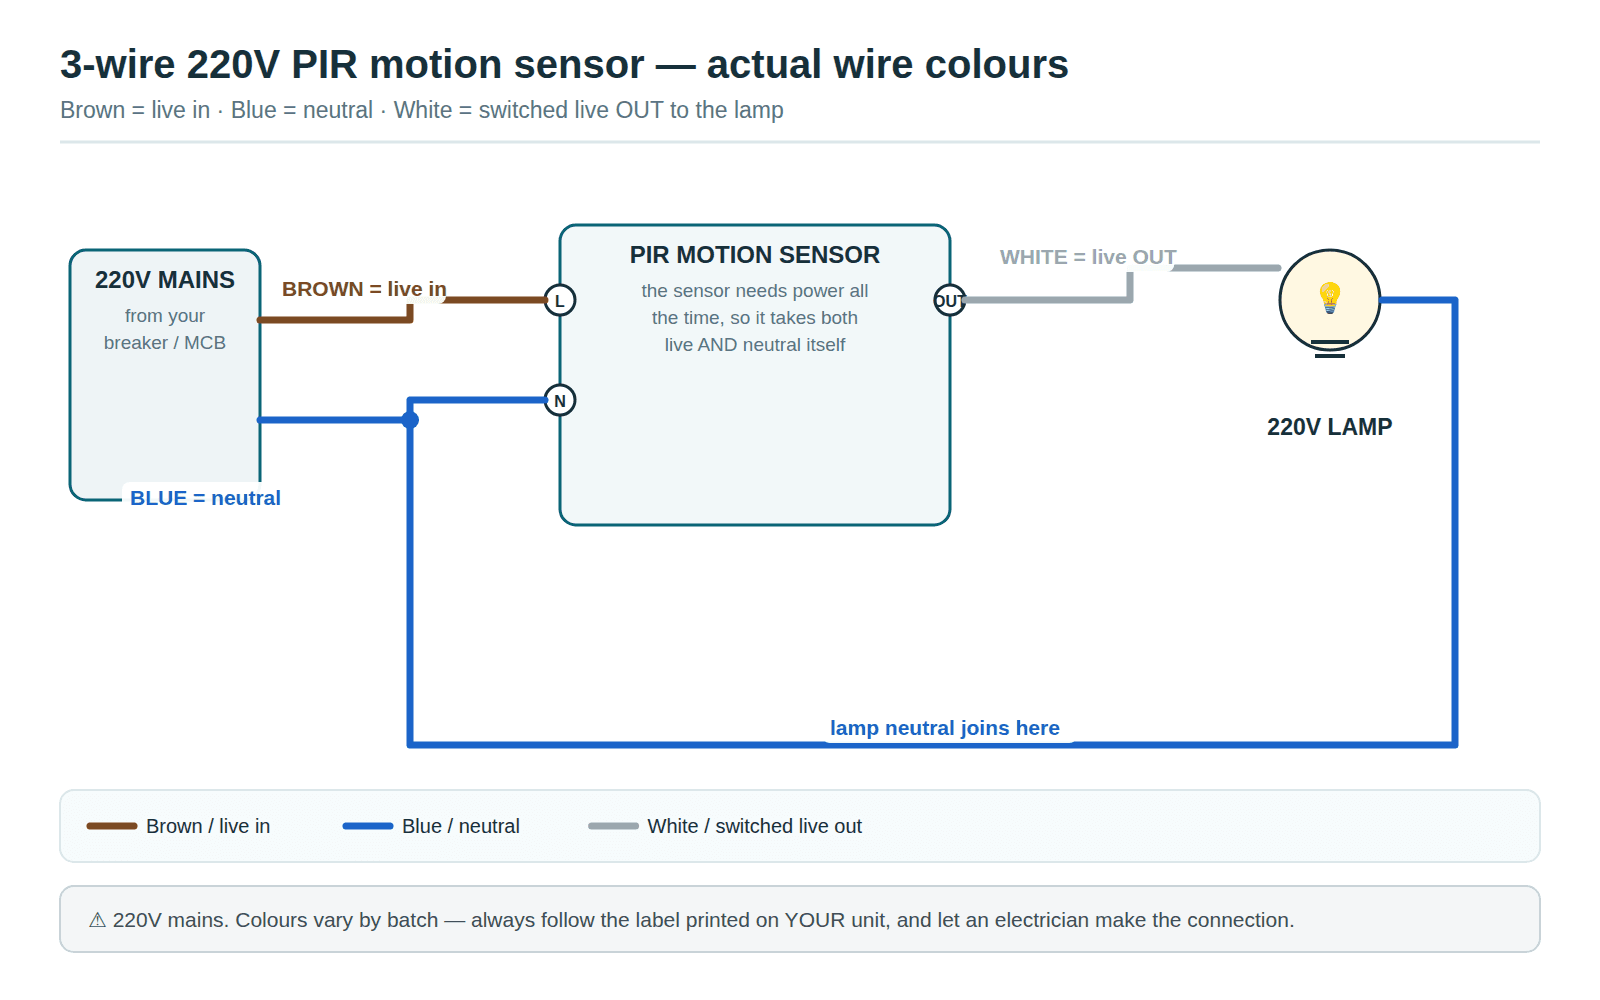
Read it once and it stops being confusing: live and neutral both go into the sensor, and only one wire comes out — the switched live for the lamp.
Step by step
- Kill the power at the breaker. Not the wall switch — the breaker. Then test the wires with a tester before touching them.
- Identify your incoming pair in the junction box or switch box: live and neutral.
- Connect live in to the sensor’s L terminal (brown wire on most units).
- Connect neutral to the sensor’s N terminal (blue), and join the lamp’s neutral to the same point.
- Connect the sensor’s LOAD wire (white on our units) to the lamp’s live terminal.
- Mount the sensor so its lens faces across the walking path, not straight down it (more on this below).
- Power up and give it 30–60 seconds to settle before you judge it.
⚠ This is mains voltage. If you are not confident with 220V wiring, buy the sensor and have an electrician fit it — it is a ten-minute job for them. Nothing in this guide is worth a shock.
Setting the three dials
Almost every 220V PIR has three adjustments, and they are almost always in this order on the body:
| Dial | What it does | Where to start |
|---|---|---|
| TIME | How long the lamp stays on after the last movement | Middle. Raise it for stairs, lower it for a gate light |
| LUX / SENS | How dark it must be before the sensor will trigger | Fully anti-clockwise (works day and night) while testing, then dial toward the moon symbol |
| SENS / RANGE | Detection sensitivity and distance | About 70%. Full sensitivity picks up next door’s cat |
Mounting height and aim — this matters more than the dials
A PIR does not see heat; it sees heat moving across its field of view. That single fact explains most complaints:
- Mount it 2–2.5 m high. Lower and it triggers on pets; higher and range collapses.
- Aim it across the path, not along it. Someone walking straight toward the sensor is detected far later than someone walking sideways past it.
- Keep it away from the lamp it controls, and away from AC outdoor units, exhaust fans and direct sun — moving warm air reads as movement.
What if my sensor has four wires?
Some recessed sensors are a pass-through design: they give you a switched live and a neutral for the lamp, so you do not tap the lamp neutral off the mains at all. If yours came on a four-pin connector, use the four-wire diagram in our ceiling sensor guide instead.
Two sensors, two jobs
We stock two different bodies for this, and they are not interchangeable:
- PIR Human Body Adjustable Motion Sensor (220V) — wall-mounted with a swivel head. Buy this when you need to aim the coverage: a driveway, a gate, a long corridor.
- Infrared Motion Sensor Light Beam Sensing Switch (220V) — a compact sensor head on a short arm, made to tuck into a fitting or a small opening. Buy this when you want the sensor hidden rather than aimed.
Troubleshooting
The light never comes on
Nine times out of ten the LUX dial is set to night-only and you are testing in daylight. Turn it fully anti-clockwise (sun symbol) and try again.
The light stays on permanently
Either the TIME dial is at maximum, or something in view is moving constantly — a fan, an AC unit, a curtain over a vent, or the lamp itself warming the sensor.
It flickers on and off
The sensor is seeing the lamp it controls. Move it, or angle it away.
It works but only when you are almost underneath it
Sensitivity too low, mounted too high, or you are walking directly at it instead of across it.
Frequently asked questions
Can I use it with an LED bulb?
Yes. Just check the sensor’s rated load — LEDs draw so little that you will never get near it.
Do I need a neutral wire?
For a three-wire PIR, yes. If your switch box only has a live loop and no neutral, you need either a neutral pulled through or a two-wire sensor designed for that situation.
Will it work through a glass door?
No. Infrared does not pass through glass, so a PIR cannot see through a window or a glass door.
Can I put two lamps on one sensor?
Yes, as long as their total wattage stays under the sensor’s rated load. Wire both lamps’ live terminals to the same LOAD wire.
Related guides
- Ceiling sensor or wall panel? Picking a motion switch for each room
- E27 motion sensor bulb holder: the no-rewiring option
- Wiring a photocell day/night sensor
Get the parts
Both sensors are in stock at Smart Home | Arduino Corner — Shaheen Market, DAV College Road, Rawalpindi — and ship across Pakistan with cash on delivery. Come in and we will show you the difference between them on the counter before you decide, or browse the whole Smart Home range online.