
Aim a laser beam across a doorway onto a light sensor. While the sensor can see the beam, everything stays quiet. The moment somebody walks through and breaks it, the Arduino fires the buzzer and prints the alert on the 16×2 LCD. It is the classic security project, and it is genuinely satisfying to demonstrate.
Below: the wiring diagram, the Arduino code and ideas to extend it. All parts are in stock at Arduino Corner.
What you’ll need
- Arduino Uno R3 (with USB cable) — runs the code
- KY-008 Laser Module — the tripwire beam
- LDR Photoresistor — sees the beam (with a 10kΩ resistor)
- 16×2 I2C LCD Display — shows the status
- Active Piezo Buzzer — sounds the alarm
- 830-Point Breadboard and Jumper Wires (M-F)
New to Arduino? Start with the Arduino Uno Starter Kit.
Wiring diagram
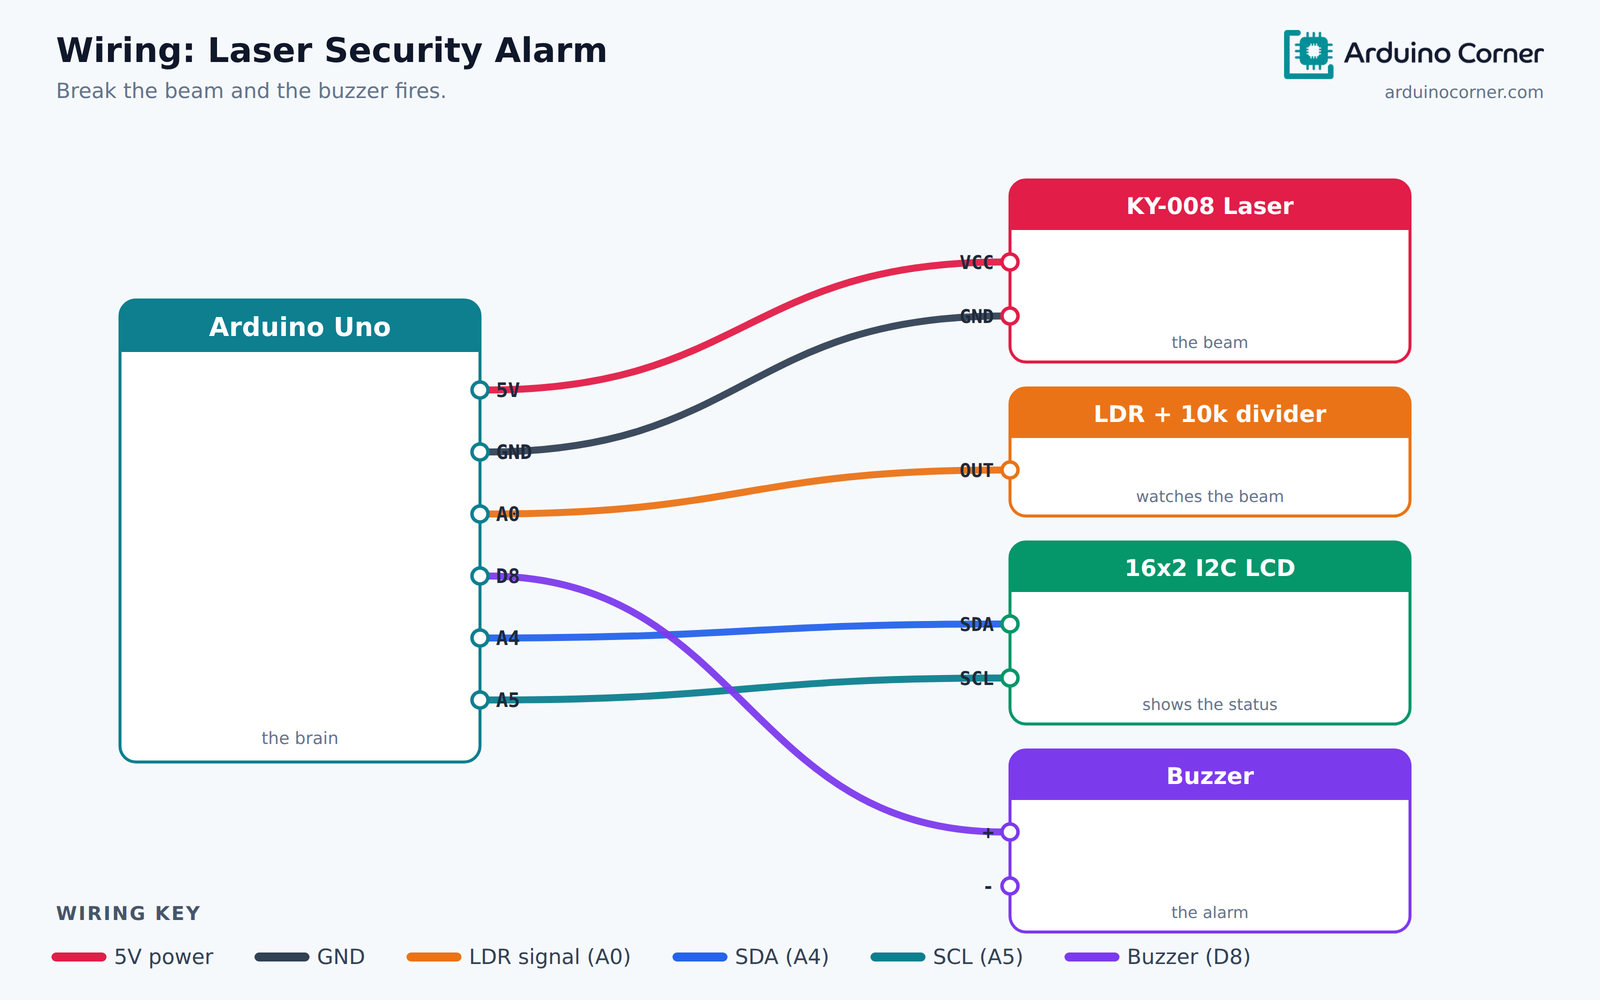
The same connections as a quick reference table:
| From (module) | To (Arduino Uno) |
|---|---|
| KY-008 Laser — VCC | 5V |
| KY-008 Laser — GND | GND |
| LDR divider — middle tap | A0 |
| 16×2 I2C LCD — SDA | A4 |
| 16×2 I2C LCD — SCL | A5 |
| Buzzer — + | D8 |
The LDR divider: wire the LDR from 5V to A0, and a 10kΩ resistor from A0 to GND. That turns the changing resistance into a voltage the Arduino can read.
How it works
An LDR (light-dependent resistor) drops in resistance when light hits it. Point the laser straight at it and analogRead() returns a high number — often 800 or more. Block the beam and the reading collapses, typically below 200. All the sketch does is compare that reading against a threshold sitting between the two, and act when it crosses.
Because the laser is a tight beam rather than a spread of light, the difference between “beam present” and “beam broken” is dramatic, which is exactly what makes this reliable.
The Arduino code
Install the “LiquidCrystal I2C” library by Frank de Brabander from Manage Libraries first.
#include <Wire.h>
#include <LiquidCrystal_I2C.h>

LiquidCrystal_I2C lcd(0x27, 16, 2);

const int ldrPin    = A0;   // LDR divider output
const int buzzerPin = 8;
const int threshold = 400;  // beam present reads much higher

bool alarm = false;

void setup() {
  pinMode(buzzerPin, OUTPUT);
  lcd.init();
  lcd.backlight();
  lcd.print("System armed");
}

void loop() {
  int light = analogRead(ldrPin);

  if (light < threshold) {        // the beam has been broken
    if (!alarm) {
      alarm = true;
      lcd.clear();
      lcd.print("INTRUDER!");
    }
    digitalWrite(buzzerPin, HIGH);
  } else {
    if (alarm) {
      alarm = false;
      lcd.clear();
      lcd.print("System armed");
    }
    digitalWrite(buzzerPin, LOW);
  }
  delay(50);
}
Understanding the code
The alarm flag matters more than it looks. Without it, the LCD would be cleared and rewritten fifty times a second, producing a horrible flicker. By tracking whether we are already in the alarm state, the display is only rewritten when the state actually changes.
The threshold of 400 is a starting point, not a law. Open the Serial Monitor, print light, and note the values with the beam on and off — then set the threshold roughly halfway between.
Troubleshooting
- Alarm never triggers: your threshold is probably too low. Print the
analogRead()value and check it really does drop when you block the beam. - Alarm never stops: the laser is not landing on the LDR. Align it carefully — the beam is narrow and a few millimetres matters.
- LCD blank or full of blocks: the I2C address is usually
0x27, but some boards use0x3F. Try the other one. - Random false alarms: room lights or sunlight are reaching the LDR. Shield it with a short tube of black paper.
Take it further
- Latch the alarm so it keeps sounding until a reset button is pressed — far more realistic for security.
- Add a keypad or RFID reader so the alarm can be armed and disarmed.
- Use mirrors to fold the beam across a room, so a single laser guards several paths.
- Log the time of each break to an SD card or over serial.
Prefer it ready-made?
Aligning a laser and tuning the threshold is the fiddly part of this build. If you would rather skip the wiring, we sell this exact project fully assembled and mounted on a presentation board — see the Arduino Laser Security Alarm Project. It is the same circuit described above, built and ready to demonstrate, which is what most students submitting a project actually need.
Frequently asked questions
Is the laser module safe?
It is a low-power 650nm pointer-class diode, the same as a presentation pointer. Do not stare into it or aim it at anyone’s eyes — treat it exactly as you would a laser pointer.
Can I use it without the LCD?
Yes. The LCD only reports the status; delete the four LCD lines and the alarm still works with just the buzzer.
How far apart can the laser and sensor be?
Several metres indoors, as long as the beam still lands on the LDR. Alignment, not distance, is the limiting factor.
Can I use a light sensor module instead of a bare LDR?
Yes — an LM393 light sensor module gives a digital output, so you would read it with digitalRead() instead and drop the divider resistor.
Related project guides
Get the parts
Everything for this build is in stock at Smart Home | Arduino Corner — Shaheen Market, DAV College Road, Rawalpindi — and ships across Pakistan with cash on delivery. Grab the KY-008 Laser Module, an LDR Photoresistor and a 16×2 I2C LCD Display. Message us on WhatsApp and we will put the whole kit together for you.